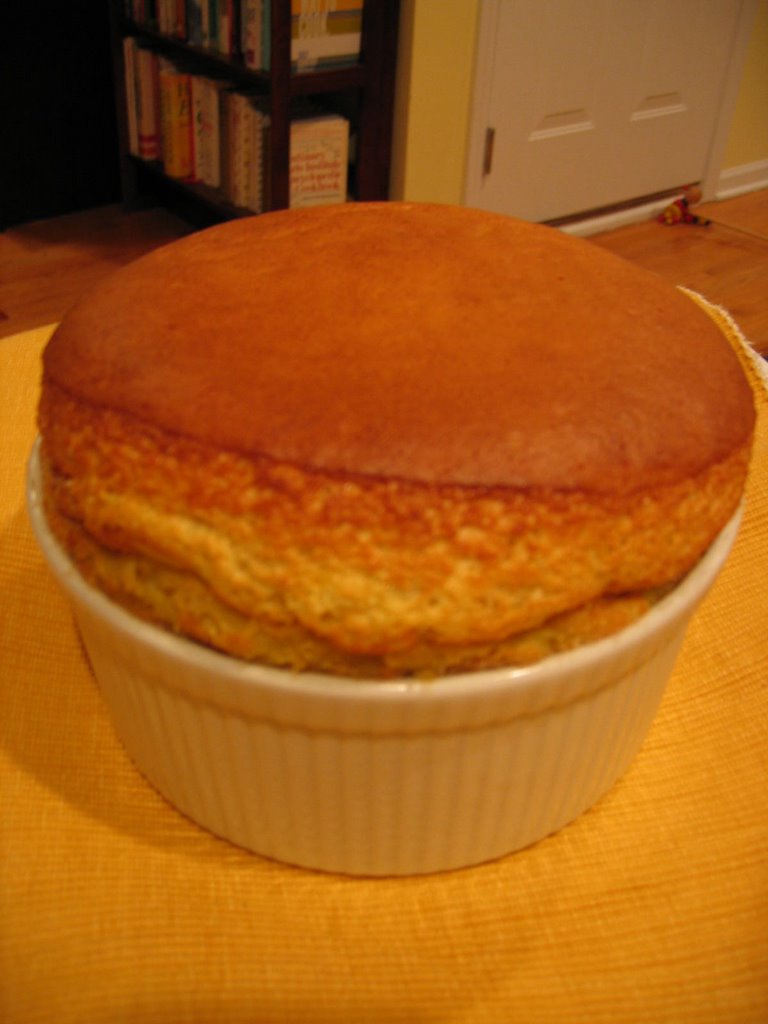
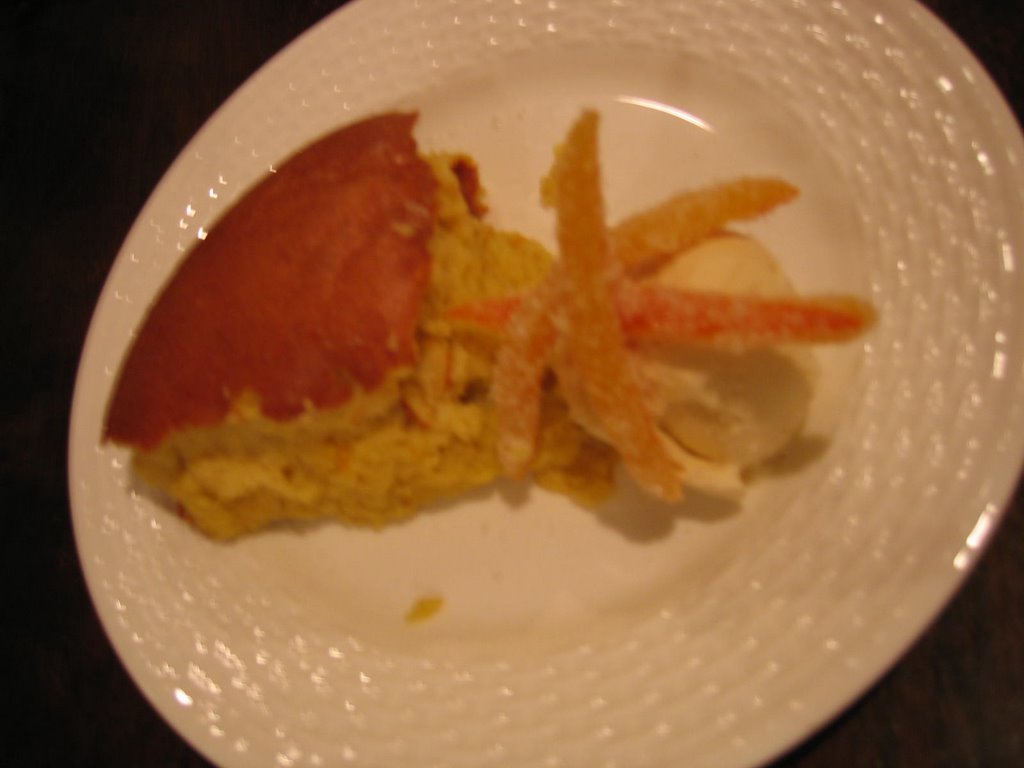
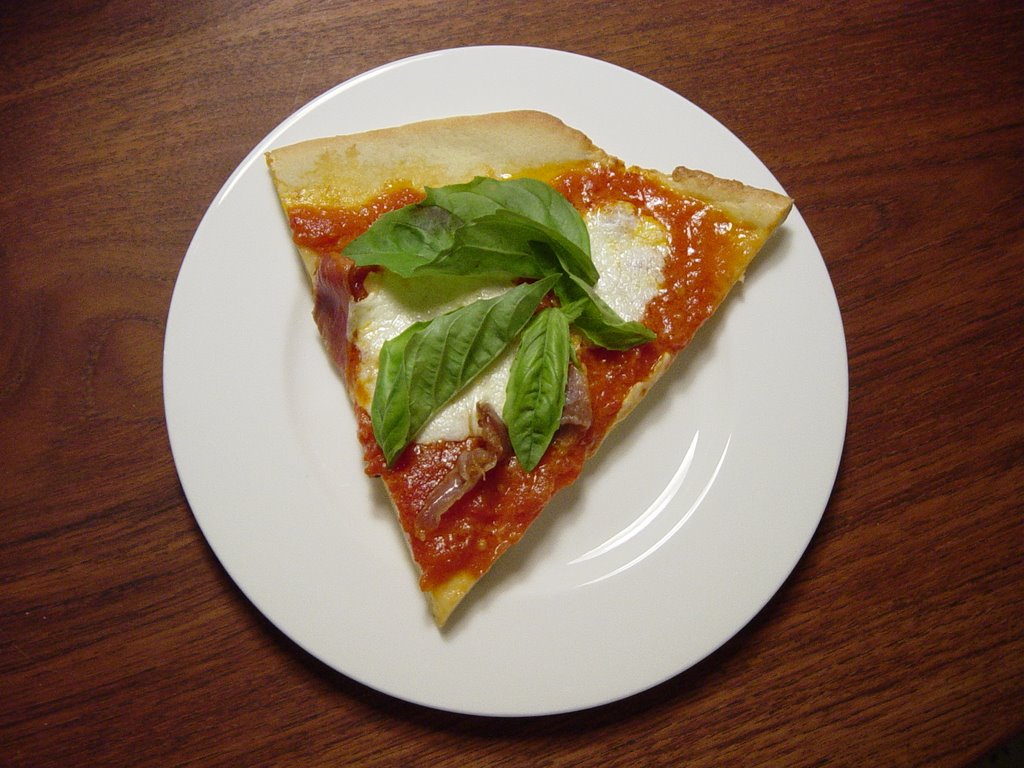
Friday, March 31, 2006

Cath: Pizza


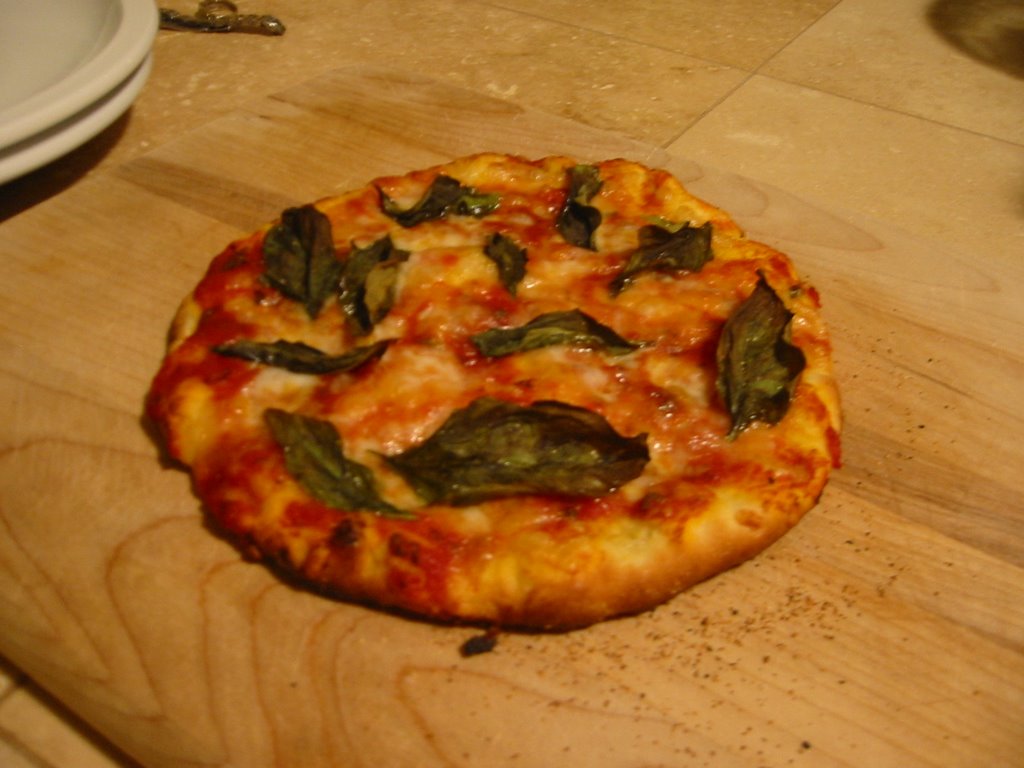
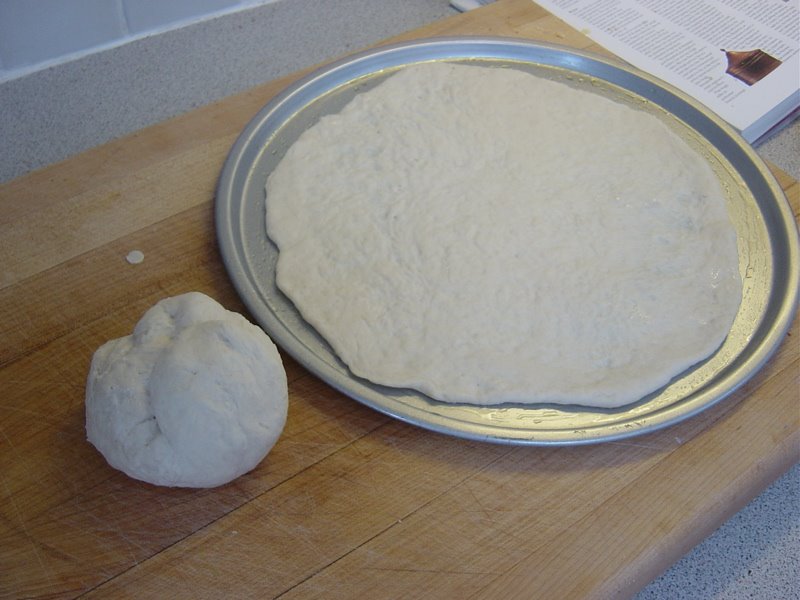
Hi everyone--the pizza was a hit here! We used a dough recipe from one of our Jamie Oliver DVDs which was 500 grams of semolina flour, 500 grams of bread flour, 30 grams of yeast (which seemed like a lot but didn't end up being overly yeasty I thought) and just over a pint of tepid water. The hardest part was kneading it out and I have to admit Rob did most of that--at 8 months prego even a little kneading is too strenuous for me these days! After about 5 minutes of kneading, we scored the top and let it proof for 40 minutes. Then we divided it into two rounds (one for later that we put in the fridge) and rolled it out. I think we could have rolled it out a little thinner to be honest. We actually do have a baking stone (bread is Rob's obsession!) but this ended up being too big for it so we just sprinkled a little semolina on a baking sheet and put it on that. The oven was set to 475 and we baked it for about 10 to 15 minutes--until the cheese was melted and the edges had started to brown a little bit. Toppings were tomato sauce, mozzarella, prosciutto and basil. Added the basil when the pizza was out of the oven just because we prefer it un-crunchy...

But! I do want to share our tomato sauce recipe. It made the pizza. My absolute favorite and so simple.

Tomato Sauce with Onion and Butter

(From page 152 of Marcella Hazan's Essentials of Classic Italian Cooking)

6 SERVINGS

2 pounds fresh, ripe tomatoes, prepared as described on page 151 (she recommends blanching them for a minute, draining them and removing their skins and then cutting them into coarse pieces OR washing the tomatoes in cold water, cutting them lengthwise in half, putting them in a covered saucepan and cooking on medium for 10 minutes--after that purée with a food mill fitted with largest holes over a bowl) OR (and this is what we used the other night) 2 cups canned imported Italian plum tomatoes, cut up, with their juice

5 tablespoons butter

1 medium onion, peeled and cut in half

Salt

Put either the prepared fresh tomatoes or the canned in a saucepan, add the butter, onion, and salt, and cook uncovered at a very slow, but steady simmer for 45 minutes, or until the fat floats free from the tomato. Stir from time to time, mashing any large piece of tomato in the pan with the back of a wooden spoon. Taste and correct for salt. Discard the onion before using.

NOTE May be frozen when done. Discard the onion before freezing.

Wednesday, March 29, 2006

Pizza Dough-Nuts


Trying to figure out what do do with my leftover pizza dough, I decided to make Giada's donuts by frying pizza dough. Yes I know frying. I know Kate and Cath both aren't the fondest of frying. But its just so good. There is nothing like eating donuts freshly fried. I put some sugar, cinnamon and ground cardamom in a brown paper bag. After lightly browning the little dough-nuts ( about 1-2 minutes), I tossed them into the bag. Shake, shake, shake. TaDa! Piping hot gems ready to be gobbled up. Glad I passed on making more pizza tonite.

Elaine: Pizza

I dream of the pizza I used to order at Pipa in the ABC Carpet and Home building in NYC. So I decided to try and make it for the first time tonight for a good friend of mine that was in town. I baked the pizza with caramelized onion and sauteed spinach. I sliced seared duck breast and scattered foie gras pate over the baked pie. The crust wasn't as thin as it could have been but still brought me back to nites at Pipa.
I also made Bill Granger's Cinnamon Tea Cake...a bit dry so I sliced up some strawberries and made a sweet cream with some ricotta, vanilla, sugar and stole some of Sam's whole milk.

Monday, March 27, 2006

Taiwanese Beef Stew

Hi everyone...sorry for the long silence! March has been a crazy month for us. Rob and I were lucky enough to have the Darers visit us in Austin this past weekend and as usual we cooked up a storm! Wanted to post pics from this one dinner that Elaine thought up. So, so good and apparently Mike's favorite...


As you can see from this pic, the base flavors are star anise, ginger, garlic and dried red chilies. Along with scallions which somehow didn't make it into the pic! I think we had about a pound of cubed beef. We browned the beef in a little oil and then threw in those ingredients along with 5 or 6 tablespoons of bean sauce (we used "Koon Chun" brand), 2 teaspoons of hot pepper sauce, 1 tablespoon of sugar, 2 tablespoons of Shao Hsing rice wine and about 1/4 cup of soy sauce. Then we added enough water to cover everything, clamped the lid on and let the pressure cooker go to town on the second ring for about half an hour. (This was at my insistence...Elaine's done it in a regular pot before--obviously it just takes longer to get the beef tender). When it was done she spooned it over some noodles and garnished with scallions and some sautéed lettuce. She is going to have to tell us how she did that but I think it was pretty simple...just regular lettuce sautéed in a little oil and more Shao Hsing. Elaine, am I forgetting anything?! Anyway, quite a treat...


Sunday, March 26, 2006

Mini Lime Cheesecakes


I bought a stack of limes the other day to make some ice cream but whilst tryingto find an old recipe I came across this one and the ice cream quickly morphed into cheesecake.

This is based on a Nigella Lawson recipe which I fiddled with a little to avoid a visit to the shops.

100g unsalted butter
230g digestives
2 large eggs seperated
200g can condensed milk
1 tblsp casterrsugar
zest and juice of 2 limes
pinch of salt

Oven at 170.
Crush the biscuits, I used my mortar and pestle as its big enough. Melt the butter then stir the biscuits into the butter untl they are well combined.
Depending on what size cakes you want push the crumb mixture firmly into the bottom. I used mini muffin tins, this is enough for 2 x 12 trays. I filled the tins to half way but before you press it in it pretty much filled each hole. This would work for 1 x 12 regular size tin also and likewise for single large cake.
Put the filled tins into the fridge for the butter to set while you continue with the rest.
Beat the egg yolks until thick add, whilst beating, the condensed milk the sugar the lime juice and half the zest. keep the rest of the zest in an air tight bag in the fridge if you are going to erve them the next day.
In seperate bowl whisk the egg whites with the salt until soft peaks form and gently fold into the yolk mixture.
With a dessertspoon fill the biscuit crusted tins. Dont go beyond the top of the hol. a couple of mine did and they were difficult to get out without trashing.
Transfer to the oven and cook for 10 mins. Remove and let cool in the tins then refridgerate for a day.
Before serving top with rest of zest.

Jer: Pizza

Peter and I had a favored meal when we lived in New York. Two doors from my apartment building there was a pizzeria called Giorgio’s. On nights when we’d actually get out before 10pm, we would take a car directly to Giorgio’s at the corner of 70th Street and 2nd Avenue and order our favorite slices of pizza and share a bottle of vanilla-spiced root beer. Maybe it was the joy of getting out of the office at a time when we could enjoy a meal together while watching the cars go by on 2nd Avenue, or maybe the pizza was actually that good but, whatever the reason, in search of perfect pizza as far as Italy and Argentina, we have yet to find the perfection of those pies.

What a treat to try making pizza for the first time at home. Pepperoni pizza is one of Peter’s favorite foods and I am always keen to layer something into the repertoire that he can get excited about (food is not a major factor in his life). Giorgio’s pies have a unique sweetness that we always thought differentiated them from others. Ina Garten has a pizza dough recipe in her book Parties that includes a tablespoon of honey. Bingo. This might be just enough to add a touch of sweetness to our crust.

A pizza stone costs something in the order of $40. However, I am a fan of value and so the allure of an $0.89 “pizza stone” lured me to our local Home Depot where I picked up two Mexican saltillo tiles. I put one directly on the floor of our oven and turned the oven up to 500 degrees. I let it heat up for almost two hours and … the tile ended up cracking in half! I think tomorrow night I will place the tile on a rack that is positioned on the lowest level since my ad hoc pizza stone clearly does not have the ability to withstand so much heat directly.

In the spirit of simplicity I made two classic pizzas. The first was a simple margherita with home-made tomato sauce (made with some crushed tomatoes, red pepper, olive oil and fresh oregano from our garden that is really flourishing in lovely spring weather), fresh mozzarella that I grated and let sit over a sieve in the icebox to sap some of the moisture, and fresh basil. The second pizza was a pepperoni especially for Pete.

I unintentionally burned the first pizza by leaving it in just a few minutes too long. Given the subtlety of the flavors of a margherita, the burnt crust really overpowered the flavor and, after a few bites, we pushed this pizza aside. The pepperoni pizza, however, was lovely. Fresh, crisp dough with the classic flavors of pepperoni and mozzarella. This one will definitely find a home in our meal rotation. I look forward to trying some interesting combinations at some point, but I think the next few rounds will focus on variations of this classic, perhaps making some dough without the honey and placing the tile on a different level. My next foray will be tomorrow night when I recreate the pepperoni and make a pizza with fresh pesto topped with some goat cheese or fontina. Thank you Ms. Brussels for the impetus for making this American favorite!

Saturday, March 18, 2006

Recipe 5: Pizza

I was'nt sure if this was glamorous enough, the photos definately arent but its something I have wanted to do for ages and never got round to. I think the yeast was the reason for my reluctance having not made bread since school but pizza must be the easiest dough to make.

I loved the rising and knocking back its obvious why bread baking is such a good school recipe.
I used Antonio Carluccio's recipe from Complete Italian Food but changed the yeast quantities which seems bizzarre as i'm not familiar with yeast but I followed to instructions on the yeast packet which seemed far more reasonable. He asked for 35 g and the packet used 8g.

400g 00 flour or strong bread flour
8g yeast diluted in a cup of luke warm water
pinch of salt

Mix flour and salt and add water with yeast in until you reach a soft dough.
Leave to reast for a while, I left it for half and hour before splitting into four balls. These will be large enough to cover a 20cm pan. Cover the balls with a clean cloth and leave to rise for at least an hour.
After it has doubled in size knock it back and then knead each dough ball. Then roll them out to about a 5mm thicknesss leaving a raised edge all the way around.


Place these on oiled pizza pans or dishes and set on a baking tray.
Add your topping.

I did two different types.
I used the same tomato base for both.
Crushed tomatoes with a little garlic and salt and pepper and the tiniest amout of sugar.

For Greg and I placed anchovies on it before I baking then once out of the oven I lay some fresh oregano leaves on, it was so simple but devoured in one hit.

Then for Hugo I sliced a sweet potato really thinly so it would cook well in the short cooking time. Dotted it around with some rolled up pieces of ham. That too was a success and the two flavour combinations complimentedd each other well.

So it was a cheese free zone, not intentionally infact I didnt think about it until Greg pointed it out.

Friday, March 17, 2006

Three Cornered Hats

Its time to make the Jewish Purim cookies! Hamantashen, the three cornered hat. I usually make mine with a poppy seed and apricot filling. But this year, I decided to make mine with a cherry almond and prune filling. I finally found a dough for the hamantashen that I love. Not too bready. Not too much like a cookie either. Perfect cakey dough wrapped around any delicious filling of your choice. Thank you Gail for this great recipe for hamantashen dough.

1 c. sugar
1/2 c. butter
2 eggs
2 T. sour cream/yogurt
1 t. vanilla
2 1/2 c. flour
1/2 t. salt
1/2 t. baking soda

Mix sugar, butter, eggs, sour cream ( I used yogurt. just make sure you drain it. let it sit in a sieve for an hour) and vanilla together. Slowly stir in flour, salt, and baking soda. Mix well, wrap in wax paper and refrigerate overnight.
Preheat oven to 400 degree. Roll out dough to approximately 1/4 inch in thickness. Cut out circles of about 4 inches in diameter. Fill with whatever you like (use less than you think you need) and fold. To fold, take the circle of dough at 1 and 11 o'clock, make an upside-down "V" with top part of the circle, and pinch together to make the top corner. Then fold the bottom part of the circle up and pinch the bottom two corners together. You should end up with a triangle. Cook on a greased sheet for approximately 10 minutes or until the bottoms turn golden brown. (makes about 15-20)

Prune Filling - Baking with Julia Cookbook
1 c. prunes
1 c. water
1 c. sugar
2 T. lemon juice
1/2 t. cinnamon
1/2 t. vanilla

Microwave prunes water and sugar for 10 min (take out and stir every couple minutes). Add lemon juice, cinnamon and vanilla. Puree in food processor. Bring to room temp before filling the pastry. Otherwise you can store it in the frig for up to 2 weeks.

Saturday, March 11, 2006

Oyster Tasting


Lucky for me, my friend who also LOVES oysters came to Chicago for a visit. She was talking about how she's ordered oysters online, they harvest them next day and FexEx them overnight. So I decided to take her to Dirk's Seafood market. It's a small friendly market that was just recently recommended to us by friends. They always have a variety of oysters available and the day we went there was a special: $12/dozen. So we bought some Kumamotos, Delaware Bay, and Saline Oysters. Brought them home and shucked them all. We were trying not to eat too many while shucking because we were hoping to sit down at the dining table in a semi-civilized manner and suck those babies up as starters to our dinner..heehee. They were gorgeous...sweet, salty like the ocean, firm and succulent. I really should to try and make this a monthly treat for myself.

Thursday, March 09, 2006

Jer: Souffle a l' Orange

While Peter and I lived in Buenos Aires in 2003, we did many things that we might not otherwise do at home in the states. Part of this was the devaluation and its lovely effect on our pocket books. Part of this was the pressure that those of us who have lived in a foreign country are so familiar with - the need to do as much as you can for fear of being back at home and feeling like you should have, could have, done more. And part of it was the romance of Buenos Aires, the self-proclaimed Paris of south America that for all its pomp is as romantic and soulful as cities come. One night we dolled up for an evening of Carmen at the Teatro Colon, the most European and grand of the Latin American opera houses. A venue that rivals those gems in Europe - we were certain it was going to be a perfect evening.

We had an unfortunate revelation that night. Opera was a great form of entertainment in a different time, when men and women of the leisure class actually had time to leisure. It was for a time when it was perfectly normal to spend four hours watching people sing in a language you didn’t understand, in spite of the uncomfortable seats and aisles that are much too short for modern day man. I love listening to a good opera CD and can belt a mean Toreador with the rest of them. But the performance was so long, and we were so hungry, we left after the third intermission and never looked back. The whole experience just felt like it was made for a different time. My soufflé making experience reminded me of that night at the Teatro Colon.

Don’t get me wrong, I enjoyed the process very much. My dear friend Julie was in town for the weekend and she is as interested in cooking and food as I am. We followed the recipe to a T and were very excited about it, having gone out to buy ingredients and a soufflé pan that afternoon as well as chilling the hardware to peak the egg whites. The process just felt a little out of sorts in today’s modern world. As if the only way to really enjoy the end product was having help in the kitchen carefully watch over the prize while you were in the other room enjoying a glass of wine and nice company. It wasn’t the sheer time involved as we’re generally not afraid of spending several hours in the kitchen. I think more than anything it was the timing of it all. The need to put the soufflé in just before we sat down to dinner. The steps involved. The worrying and watching during our meal in fear of it burning or falling. It was beautiful when it rose and our pride was maternal. But through our meal we watched that oven with trepidation. I think the need to have the timing just right took away from our ability to really enjoy the tasting part of the experience.


Believe me. This will not be my last soufflé, although my next foray will likely be a savory souffle so that I don't stress out during the meal watching what is in the oven. This first experience taught me a little about myself in the kitchen, and, frankly, what defines a solid cooking experience better than that. I learned I really like when things are done ahead of company’s arrival. I think that’s why I like braising so much – all the hard work takes place the night before. I reaffirmed my belief that I’m much more of a cook than a baker. And for the first time, I had a real appreciation for why waiters always tell you about the soufflé special when serving your main meal!

Wednesday, March 08, 2006

Kate: Souffle a l' Orange


Having never made souffle before I had a completely different expectation of the texture. I made little brown sugar shortbread biscuits to go and served some mascapone. The velverty mascapone went beautifully but the biscuits should have been flicked to another course with cheese or something, anything but the souffle.

The souffle itself, or themselves as I did individuals, rose to the occasion. I used blood oranges and some liquore but still there wasnt enough orange flavour for me. I think it could have benefitted from some orange oil which I had but was reluctant to use incase it was over powering.
I love the texture of the souffle but I found the egginess a little too much. This was definately a personal preference as Greg and my friend Jen both loved it. So maybe the need for more orange was a mask rather than enhancer. I have realised from this excercise that eggy desserts are not my thing and I admitted to them, and myself, last night that even the renowned creme brulee is too much after one egg filled spoonfull.

I enjoyed the cooking process and this was a great recipe suggestion Ashley. That texture was something else so I will definately souffle again but in a savoury setting...much to Gregs dissapointment.

Sunday, March 05, 2006

Elaine: Souffle a l'Orange

When I got back to Chicago from Brussels, one of the first things I did was call Bonnie Slotnick to order a couple books that I've been looking for. One was Chez Panisse Desserts. I've had it on my bedside table ever since it came to me in the mail (my new favorite). So I had to compare how Julia and Chez Panisse did their souffles differently. The suggestions Chez Panisse had were to fold/layer candied peel into the batter, topping with carameled tangerines, pouring cold creme anglaise, or drizzling caramel. I was inspired to attempt the candied orange peel. Definitely recommend all of you to try it if you've never made candied citrus peel. I can't stop nibbling on them. I also look forward to dipping them in some dark chocolate.
Back to the souffle...For the souffle, I used zest of blood oranges. Before putting in the oven, I remember Julia tying a paper collar to her souffle mold to help the souffle climb up up and away!

I will definitely use the paper collar for all future souffle baking. I was so excited to see it climb up 2x high. However, the height of souffles don't last very long.

I had my camera ready before it deflated. So, herd your guest to the table before you take the souffle. l I decided to pair my souffle with a substitute for creme anglaise ... vanilla ice cream (thats been in my freezer since before i moved to Brussels. scraped off the freezer burn and its as good as new). Topping the ice cream with some candied peel added a chewy treat to our fluffy souffle. Delicious.

Candied Citrus Peel-by Chez Panisse Desserts

4 oranges, 6 lemons/tangerines, or 2 grapefruits
1 c. sugar
1/2 c. water
2 T. corn syrup or 1/4 t. cream of tartar
about 1 c. sugar for sprinkling the peel
Peel the fruit in quarter sections. Cover with cold water. Bring to a boil and simmer until pith turns translucent. Let stand in water 15 min then drain. Make a syrup of sugar, water and corn syrup/cream of tartar. Using a spoon, scrape the white part off peel as completely as possible. Cut the peel into thin strips and add to the syrup. Cook slowly until peel is tender. Turn up heat until syrup turns 230 F/110 C. Have a cookie sheet ready with a layer of sugar sprinkled on it. Drain peel of syrup. Quickly put drained peel on sugared sheet. Sprinkle peel with more sugar to cover. Toss with sugar to separate pieces. Be careful not to burn your hands, cuz I did. Store the candied peel layered with its sugar in a covered container in the frig where it will keep indefinitely.